So it’s happened: you put off getting a Valentine’s gift for your sweetheart and now you’re panicking, since you either (a) think roses are a total ripoff, and support child labor in Ecuador [plus you’re a cheapass] or (b) simply forgot about it. Really.
Well, you’re in luck, because I have the perfect solution: SCRUMPTIOUS VEGAN VALENTINE SUGAR COOKIES. Because who doesn’t like cookies?
This recipe, taken from the awesome Vegan Cookies Invade Your Cookie Jar recipebook by my vegan goddess-heros, Isa Chandra Moskowitz and Terry Hope Romero, is definitely one of my favorites.

Not only is the recipe versatile– you can make lemon, almond, chocolate and other flavor varieties I haven’t yet thunk of (Mango? Pomegranate? Broccoli? Ok, maybe I’m getting a bit too far) and add in anything like nuts or even rosemary, I bet it’d still taste good. Think of the sugar cookie as a baker’s edible blank canvas.
How Hard is it, dude? ![]() (SUPER EASY)
(SUPER EASY)
How much time before I can go watch Walking Dead reruns: takes about 1 1/2 to 2 hours, total for the speedy, add overnight refrigeration to that if you have the time
Is it worth it? ![]() (Heck, yes!)
(Heck, yes!)
Ingredients: (makes about 25 palm-sized cookehs)
2 1/3 cups all-purpose flour
2 tbsp cornstarch
1/4 tsp salt
1/4 tsp baking powder
1/2 cup margarine, slightly softened (like Earth Balance “butter” sticks)
1/2 cup nonhydrogenated vegetable shortening (I used Earth Balance sticks for this too, since I hate shortening)
1 cup sugar
2 tsp pure vanilla extract
1/2 tsp lemon extract (you can also use almond, maple or any other flavor)
1/4 cup vanilla soymilk (or other non-dairy milk) — I used coconut creamer, which I personally think made the cookies taste WAY better
Step 1- Beat the Butter
In large bowl, cream the shortening, margarine and sugar with electric beaters until the mixture gets all soft and fluffy, for at least 4 minutes.

Step 2- Add in the flavor
Scrape down the sides of the bowl with a rubber spatula. Now add in the vanilla and whatever extract you’ve chosen, and the soymilk (or recommended creamer– I used So Delicious Coconut Creamer) and beat it all up until everything is just combined.
If you want to be adventurous and use strawberries, raspberries or other fruits (to make your cookies naturally pink!), now is the time to do so… add 1/2 cup of the mashed fruit and blend that in as well!
Note: don’t overbeat it or your cookies will taste too tough!


Step 3- Make it Doughy
Now it’s time to add in your flour, cornstarch, salt and baking powder… add these in, along with about 1 cup of the flour, and beat it till they just combine. Your dough will get tacky to the point that your beaters won’t work, so at that time, add in the rest of your flour, the 1 1/3 cup. Then use your hands to roll your dough into a smooth mound.


Step 4- Take a Chill Pill
Now comes a bit of waiting! Divide the dough into two and roll/smush each portion into a disc. Wrap each disc generously in parchment paper (plastic wrap is gross, check out item #3 on that site… I don’t trust any kind of plastic at all if I can help it! Plus parchment paper is pretty cheap and makes you feel Englishwoman-fancy when you say it.) and refrigerate for a few hours or overnight.
*Note: if you just don’t want to wait that long, just stick the dough in the freezer for half an hour… it’s just enough time to solidify it a bit, and not totally freeze it. The reason for chilling the dough is to make the cookies flakier in the end!

Step 5- Rollin-and-a-ramblin’
Now it’s time to roll each disc to about 3/8ths-inch thickness… you won’t need a cutting board for this if you used the parchment paper like I did (hence why I said generously wrap your dough up there), simply roll the dough out directly on the sheet.
You’ll also save flour– the dough doesn’t stick to the paper or to your rolling pin at all, since it is very buttery.

Step 6 – Cut Your Hearts Out
Preheat your oven to 350 degrees at this point.
This is the most fun part! Cut your dough into shapes with your cookie cutter(s). As you cut, you can put your shapes onto the same piece of parchment paper, making room for it by scrunching up the overlapping areas you just cut, killing two cookies with one stone. Space the cookies evenly, about an inch apart.
A good time-saver I’ve found is to cut your shapes reallllly close, so you don’t have to gather the dough/reroll as much as if you spastically cut wherever you please. It’s also good to invest in cookie cutters of multiple shapes and sizes for the same reason!
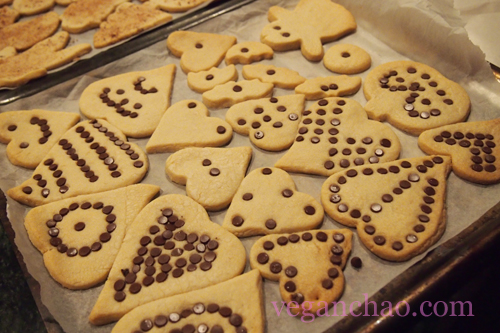
*Note: obviously my little sister didn’t realize this trick in the photo below, so it was time for a Vegan Chao baking technique lesson-session. Won’t be happening again!

Step 7 – Decorate & Appreciate
If you like your cookies nekkid, feel free to skip this step, you lazy fart.
Just kidding.
I’m not a fan of artificially-colored crap like sprinkles or sugar, so I opted to use some mini Ghirardelli chocolate baking chips (they cost about $2.50-$2.99 at your typical grocer) like little studs to decorate. Make a cute face for once!
Another option is to top with cinnamon sugar (1 part cinnamon to two parts sugar) or powdered/cocoa powder. You can put these on after they’ve baked, but I’ve found the toppings tend to easily rub off if you do that, since the cookies harden. So I simply rub the sugar into the actual dough and bake it– it turns out perfect.


Step 8 – Easy Bake!
The easiest step ever: bake the cookies for about 10-20 minutes until done, depending on how many cookies you put on your sheet. I’m impatient and don’t like doing two baking sessions, since it wastes gas… so I cram all my cookies into two sheets.
That means they end up touching, but it’s ok since they can be easily separated. Besides, this isn’t like, a baking beauty competition anyway, and it’s all headed towards your tummy eventually.
Don’t forget: the bottom tier of your oven bakes faster, so put the denser cookies on the bottom.
Step 9 – Cool it off
Remove the cookies from the oven and allow them to cool for five minutes. Or do like me and just eat them, melty chocolate chips and all. Mmmmmmmmmmmm.


Step 10 – Presentation is the Key… to their Heart!
Now you can put these all in a cute little basket, add a construction paper Valentine cutout heart (never gets old) and present it to your lucky lova. Or lovahs. Whatever your ish is.
